

MPCToolkit Sample Chopper
User Manual – v0.14
1. Introduction
MPCToolkit Sample Chopper is a standalone sample-chopping application and VST3 plugin for fast sample-based music production.
Load an audio file, divide it into playable chops and use the 16-pad layout to create new patterns and performances.
Each pad can be edited independently with its own playback settings, envelope, filter, fades, looping and other parameters.
The integrated Stem Separation engine can also split a source into individual musical elements before chopping.
2. Loading a Sample
Use the LOAD SAMPLE function to select an audio file.
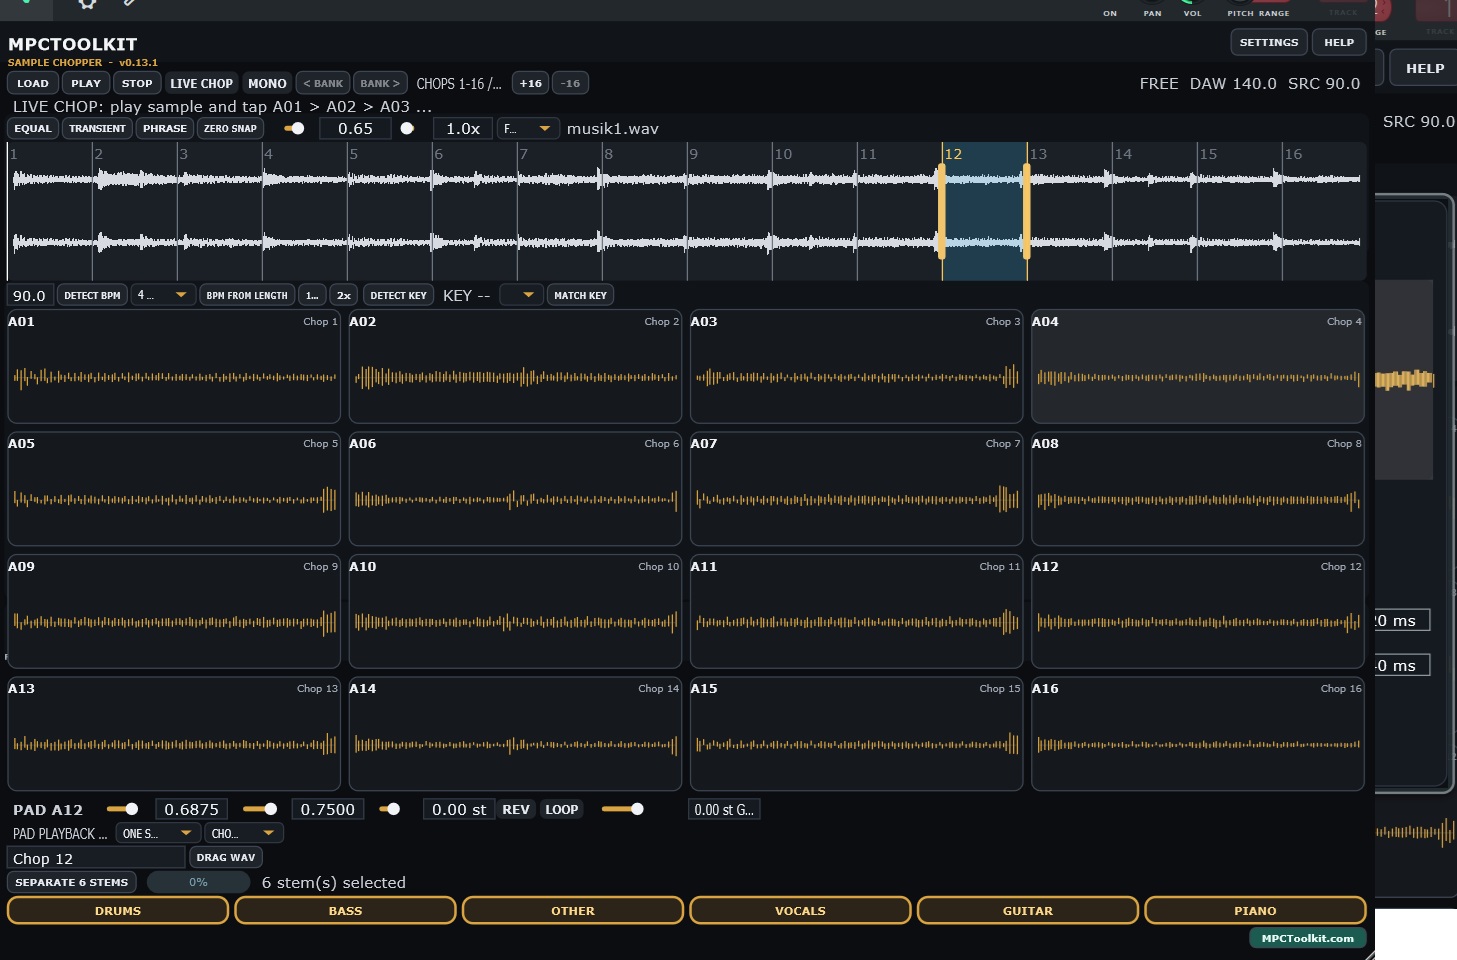
After loading, the waveform appears in the main waveform display and the sample can be divided across the available pads.
The pad bank contains:
A01 – A16
Each pad displays a small waveform representing its assigned chop.
Click a pad to play it.
3. Creating Chops
The loaded sample can be divided into multiple chops.
Chops can be created automatically or adjusted manually.
Each chop has its own:
- Start position
- End position
- Name
- Pitch
- Fade In
- Fade Out
- Playback Mode
- Loop setting
- Choke Group
- AMP Envelope
- Filter
The waveform shown on each pad represents the audio assigned to that pad.
4. Playing the Pads
Click A01–A16 to trigger chops.
The pads can also be played using MIDI notes.
The default mapping starts at:
| Pad | MIDI Note |
|---|---|
| A01 | 36 |
| A02 | 37 |
| A03 | 38 |
| A04 | 39 |
| … | … |
| A16 | 51 |
This makes the Sample Chopper playable from a MIDI keyboard, pad controller or your DAW.
5. Mono and Poly Playback
Use the playback settings to determine how chops interact.
MONO
Starting a new chop stops the previously playing chop.
This is particularly useful for traditional sample chopping.
POLY
Several chops can play simultaneously.
This is useful for:
- Drum samples
- Layered chops
- One-shot sounds
- Percussion
- Sound effects
6. Pad Editor
Right-click any pad to open its detailed Pad Editor.
This keeps the main interface uncluttered while still providing detailed editing controls.
The Pad Editor displays a larger waveform of the selected chop.
Start / End
Drag the start and end markers to change the playable region.
Editing the boundaries is non-destructive.
The original audio file is not modified, so the boundaries can be moved again later.
Duplicate
Creates a copy of the selected chop.
Delete
Removes the selected chop.
Split
Divides the selected chop into two chops.
Merge
Combines adjacent chops.
Reverse
Plays the selected chop backwards.
Loop
Enables looping for the selected chop.
7. AMP Envelope
Every pad has its own independent AMP Envelope.
The envelope contains:
Attack – Decay – Sustain – Release
Attack
Determines how quickly the sound reaches full volume.
Decay
Determines how quickly the sound falls from its initial peak to the Sustain level.
Sustain
Sets the level maintained while the sound is held.
Release
Determines how long the sound takes to fade out after release.
This makes it possible to shape each chop independently.
For example, a long sample can be transformed into a short stab by using a short envelope.
8. Per-Pad Filters
Every chop has its own filter.
Available filter types are:
OFF
No filtering.
LP12
12 dB/octave Low-Pass Filter.
LP24
24 dB/octave Low-Pass Filter.
HP12
12 dB/octave High-Pass Filter.
HP24
24 dB/octave High-Pass Filter.
Cutoff
Controls the filter cutoff frequency from approximately:
20 Hz – 20 kHz
Resonance
Emphasizes frequencies around the cutoff point.
Because filters are stored independently for every pad, A01 can have completely different filter settings from A02, A03, etc.
9. Playback Modes
Individual pads can use different playback behavior.
One Shot
The entire chop continues playing after being triggered.
Ideal for:
- Drum hits
- One-shots
- Classic MPC-style chops
Gate
The chop plays while the note or pad is held.
Releasing the pad stops/releases the sound.
Trigger
Provides an alternative triggered playback behavior for performance workflows.
10. Choke Groups
Pads can be assigned to a Choke Group.
Pads belonging to the same choke group can stop each other.
A typical example is an open and closed hi-hat.
Choke Groups are also useful for chopped samples where overlapping sounds would otherwise become too busy.
11. Drag Audio onto a Pad
Starting with v0.14, audio files can be dropped directly onto individual pads.
Drag a supported audio file from Windows Explorer onto a pad.
For example:
A01 = original song chopA02 = original song chopA03 = original song chopA04 = external Kick.wavA05 = external Snare.wav
The newly dropped sample becomes the audio source for that pad.
The original loaded song is not replaced.
This allows Sample Chopper to function as a small hybrid sampler containing both automatically created chops and manually loaded sounds.
12. Drag a Chop into Your DAW
A chop can also be dragged out of the Sample Chopper.
Drag a pad toward a compatible DAW or Windows Explorer.
The current chop is rendered as a WAV file for the drag operation.
This makes it possible to quickly transfer chops into an arrangement without manually exporting every file first.
13. Export Chop as WAV
Individual chops can be exported permanently.
Right-click the desired pad and open the Pad Editor.
Select:
EXPORT WAV
Choose a destination and filename.
Only the selected chop is exported.
This is useful for creating:
- Sample packs
- Drum kits
- MPC sample folders
- DAW arrangements
- Personal sample libraries
14. Stem Separation
Sample Chopper includes local Stem Separation.
A source can be separated into:
DRUMS
BASS
VOCALS
PIANO
GUITAR
OTHER
All stems are enabled by default.
Click a stem button to enable or disable that particular element.
For example:
DRUMS ONBASS ONVOCALS OFFPIANO OFFGUITAR OFFOTHER ON
The resulting combination can then be used as the source for further chopping.
Multiple stems can therefore be combined.
Stem Separation runs locally on your computer.
No stem credits or external stem-separation subscription are required.
15. MIDI Control
The pads can be triggered using an external MIDI controller.
This allows the Sample Chopper to be played like a hardware sampler.
Velocity information from MIDI controllers can be used for performance where supported.
16. MIDI Performance Output – v0.14
Pad performances from the graphical interface can additionally generate MIDI output.
The pad mapping is:
A01 = MIDI Note 36
through
A16 = MIDI Note 51
This is intended to make it possible to record a performance played on the Chopper pads into a DAW.
FL Studio
MIDI output generated by a VST3 instrument may require additional routing in FL Studio depending on the Wrapper and MIDI configuration.
If audio plays when clicking the pads but no MIDI notes are recorded, check the plugin MIDI output/port routing.
17. Scratch Control
Sample Chopper includes experimental MIDI scratch control.
An external MIDI controller such as a Mod Wheel or Pitch Bend controller can be used to manipulate sample playback.
Scratch-related options are available from the application’s settings rather than occupying permanent space in the main pad area.
This feature is intended primarily for experimental performance and sample manipulation.
18. Interface Scaling
Interface scaling options are available from the top application menu.
Use these settings when working with different monitor sizes or display scaling configurations.
19. Saving DAW Projects
When Sample Chopper is used as a VST3 plugin, its current state is stored with the DAW project.
Stored settings include pad/chop information such as:
- Chop positions
- Pad names
- Pitch
- Reverse
- Loop
- Fade In / Fade Out
- Playback Mode
- Choke Groups
- AMP Envelope
- Filter Type
- Filter Cutoff
- Filter Resonance
- Per-pad sample assignments
Important
Sample Chopper currently stores references to the original audio files.
Do not delete or move source WAV files required by an existing project.
If an external sample assigned to a pad is moved or deleted, Sample Chopper may not be able to restore that audio when the DAW project is reopened.
20. Standalone vs. VST3
Standalone
Use the standalone application when you want to:
- Prepare samples
- Create chops
- Separate stems
- Experiment with samples
- Export individual WAV files
VST3
Use the VST3 version directly inside your DAW.
This provides:
- DAW project recall
- Host synchronization
- MIDI input
- MIDI performance output
- Direct audio workflow with your production environment
21. Activation
An MPCToolkit account is required for initial activation.
Enter your MPCToolkit login information when requested.
After successful activation, the application stores its local activation state so that you do not need to enter your login every time you start the plugin.
Your account password is not stored by the plugin.
22. Recommended Workflow
A typical sample-based workflow could look like this:
Load Sample → Separate Stems if required → Create Chops → Adjust Start/End → Set Mono/Poly → Adjust ADSR → Add Filters → Play Pads → Fine-tune Chops → Export/Drag Chops → Record your performance in the DAW
Or build a hybrid kit:
Load Song → Chop Song → Drag Kick onto A13 → Drag Snare onto A14 → Add percussion to A15/A16 → set drum pads to Poly → play everything from one instrument.
That second workflow is where the new Drag-In feature becomes especially interesting.